Quick Start Guide
Before ordering, we highly recommend watching our tutorial videos here
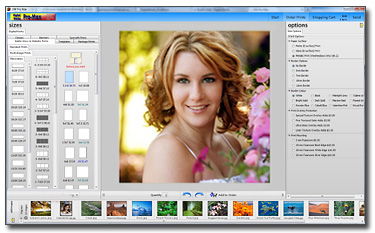
To start ordering, click the Order button on the Top right hand side of the Menu Bar.
**Digital Works highly recommends pre-sizing images to the required print size at 200-300dpi prior to upload.
(Images are not resampled prior to or during upload to our servers. Unnecessarily large images will substantially slow your upload speed and potentially delay your order.) Click the 'Order' button on the Top right-hand side of the Menu Bar to start ordering.
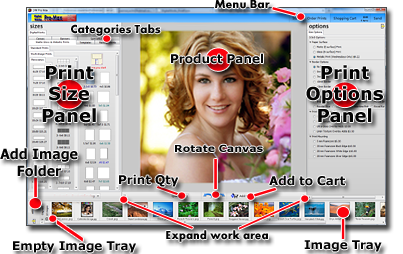
- To view images to order, click the "Add Folder" button
( in the lower left corner of the screen. Navigate to your pre-sized images folder then select choose.) - The images will appear in the Folder Panel within the Image Tray.
- Multiple folders can be added to the Image Tray
- In the "Print Sizes Panel" on the left, 'click' to select the Print Size you would like to order.
- The "Print Size" selected will appear in the center Product Panel.
- Click & drag an image from the Image Tray to the Product Panel.
+A / Crtl+A Select All Images
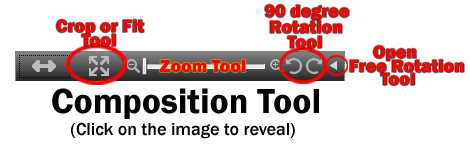
(or Drag&Drop image(s) into the Print Size product direct from your pre-sized image folder) - Click and hold on the image will allow composition of the image within the Product.(Crop Mode Only)
- By clicking on the image within the Product Panel, a tool will appear which allows zoom, pan, and rotate the image.
- The icon on left of this Tool allows the entire image to fit within the Print Size.
- Clicking again will revert to the 'Crop to fill' option.
- The Options Panel on the right allows the choice of paper type, color type, mounting, framing options etc.
- Enter the quantity you want to order in the Print Quantity box.
- Then click the 'Add To Cart' button.
- The image is now prepared for printing and is added to the Order Cart to be uploaded list.
- Looking at the My Cart tab in the upper left of the Menu Bar you will see a running total as to the number of items ordered.
- Notice a shopping cart above the image indicating the images which have been ordered.
Viewing the Order Cart
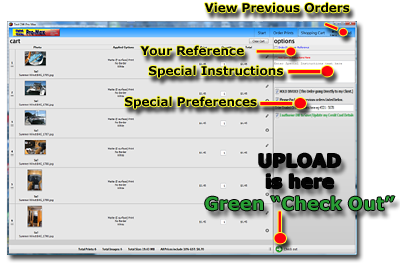
To see what you have ordered Click on the View cart icon. Located on the right corner of the Menu Bar.
- In the Left Hand Panel
- Thumbnail of each image ordered.
- The applied printing options.
- Price of the product ordered.
- Quantity ordered(change the quantity ordered here if required)
- Total price
- Edit (takes the image back for composition or option changes)
- Delete options
- On the right hand Options Panel
- Additional Notes area
- Your studio reference
- Freighting direct to client check box and Hold Invoice
- Packing previous orders together to save on freight.
- Authorisation to Save Credit Card Detail at DW invoicing for future orders
- Along the bottom Bar
- total number of images in the order
- total size of the order in megabytes
- total price.
- Check-Out Button (Green Button)
- Save Order Button(to save the order for completion in a later sitting)